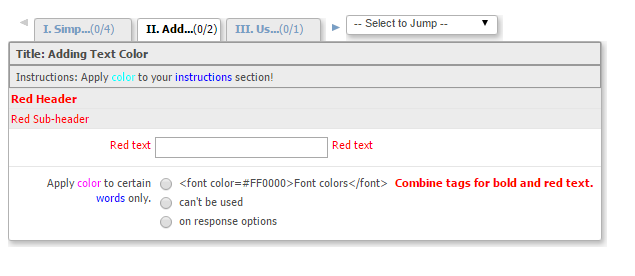
In some cases, the display of your OpenClinica eCRF may not be exactly what you had in mind. You may want to highlight key words or phrases, create a bullet point list, or insert a URL or image. Using HTML tags, you can make some simple manipulations to change the look and feel of your case report forms and make them more inviting for data entry.

The HTML tags described in this document can be used in the following columns in the CRF Excel template:
- Items Tab: LEFT_ITEM_TEXT
- Items Tab: RIGHT_ITEM_TEXT
- Items Tab: HEADER
- Items Tab: SUBHEADER
- Sections Tab: INSTRUCTIONS
What are HTML tags?
HTML, or Hyper Text Markup Language, is a markup language that is commonly used for web page development. HTML is written using “tags” that surround text or elements. These tags typically come in pairs, with a start tag and an end tag:
Text to format</end tag>
To insert an HTML tag, simply surround the text you want to format with the desired tag. Below are the HTML tags that work in OpenClinica:
You can download this HTML Tags Knowledge Article to help you to get started.
Inserting URLs and Images
HTML also allows you to insert a URL or Image into your CRF, which may be used to provide users with additional information or references.
Insert a URL
A URL may be inserted into a CRF in order to provide a link to further instructions or protocol information. To insert a URL into your CRF, use the following format:
Simply replace the areas highlighted in yellow with (a) your URL (inside the quotation marks) and (b) the hyperlinked text that you want to display to the user.
The following example will prompt the user to “Click Here!” and will open the OpenClinica website in a new browser tab:
Click Here!
Insert an Image
Similarly, HTML can be used to insert an image into your CRF. You might consider using an image to display a pain scale (or other reference image), or even to display your company’s logo.
To insert an image into your CRF, use the following format:
<img src=”images/ImageName”>
Again, simply replace the highlighted text with your image name. You can use PNG, JPG, or GIF image extensions. You can control the height and width of the image using the following format:
<img src=”images/ImageName” width=“n” height=“n”>
The highlighted n corresponds to the desired width and height of the image in pixels.
The following example will insert an image (image1.png) with a width of 300 and a height of 150:
<img src=”images/image1.png” width=”300″ height=”150″>
You can download this Images & URLs Example CRF to help you practice.
The examples included in the above CRF Excel template will insert an image that already exists in the images directory of your OpenClinica application. To insert a custom image, community users will need to place the image in the following directory of the OpenClinica application:
tomcatwebappsOpenClinicaimages
OpenClinica Enterprise customers can request an image be placed on the application server by reaching out to the OpenClinica Enterprise Support team via the Issue Tracker.
Have you used HTML in your CRFs? Let us know if you have any other suggestions or tips!
IMPORTANT NOTES:
The RESPONSE_OPTIONS_TEXT field is not included in the list above, as HTML tags are currently not supported for response options.
The QUESTION_NUMBER field will display the text properly, but has been known to cause issues when extracting data. Therefore, HTML should not be used in this column.


